Showing posts with label backgrounds. Show all posts

Monday, January 17, 2011

Work Reel with Colored Backgrounds and 'Little Bang Theory' Music!


The clock is counting down and there is much to do. So let's get crackin'!


Also present in my current real is the musical stylings of 'Little Bang Theory' who specialize in composing and playing songs on toys and childrens instruments. For my film they gave me premission to use "Garden Party", "Dada boy Overture", and "Toy Suite #3" in that order from their 'Elementary' CD. The three members of Little Bang Theory are Frank Pahl, Terri Sarris, and Doug Shimmin.

Saturday, January 15, 2011

BACKGROUNDS ARE DONE!!


Man, I have really come to appreciate what an amazing tool photoshop is. There is no way I would have been able to color so many of these things by hand and still have a full head of majority brunette hair. I've been putting my foot pedal to the metal on finishing these backgrounds since the start of winter break and now they finally are done! I know that I might have to go back and change a color here or tweak a gradient there but there is sometime so amazingly satisfying about scrolling through your entire work reel and every bit has a colored background. it really juices it up. but most importantly, now my time can be focused towards forging out the animation!

Something about passing another milestone in film production makes you feel like a Thunder Cat!


Wednesday, January 12, 2011

The Backgrounds Are Almost Done!!


There is still a small handful of background left to be worked on. Some I'll have to draw from scratch and some I just need to make some tweaks to an existing background for a new shot. Either way, the final has become a lot more colorful since the end of the fall semester. I have a lot of fun coloring the backgrounds and I'm pleased with the progress I've made over the months.


I had been pulling a lot of inspiration from the background illustrations for the anime film, 5 Centimeters Per Second by Makoto Shinkai. The movie is gorgeously realized with astounding artwork. Definitely look it up if you want to be pulled into a breath-taking visual experience.


I

Friday, January 7, 2011

Backgrounds in the Witch's Den


As the end of winter break draws closer, the background coloring process is also going to be coming to a end as well. These are some of the backgrounds from the climax of the film in the Witch's den. So far, these have been the only backgrounds that required the additional assistance of Adobe Illustrator.


Tuesday, January 4, 2011

Inside the Dark Circus: Watercolor Background Process

Tutorial time!


As I mentioned a few posts ago my very helpful background assistant, Homin Jang, painted up a collection of custom watercolor textures for me to use the backgrounds for inside the circus tent. I went with the idea of a simple textured background because I didn't want to draw too much attention away from the acrobats' performance with any overly detailed and heavily saturated backgrounds. These watercolor backgrounds are just interesting enough to lightly compliment the animation of the the acrobats without being too distracting. Another plus is that I can make them really fast and easily so they're a great time saver. Let's get started!

This is the watercolor painting I start off with.
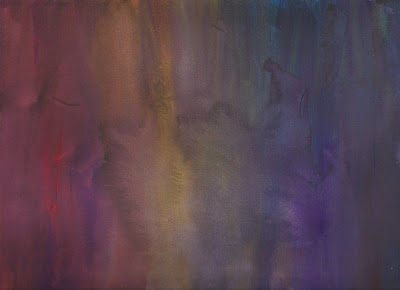

I bring it into Photoshop but I decide not to mess with levels or saturation. The colors and textures are just fine the way they are.


For these backgrounds, I'll be using my all time favorite tool, the gradient tool. I LOVE using gradients to shade and render images so it's what I'll be using to add values and colors to our painting.


Make a new layer overtop the original painting and select the color black with your color picker. Make sure to have the color-to-transparency setting selected and also don't forget to play around with the opacity. Use both the linear and radial gradient tools for varying looks.


Now just drop in some random gradient values anywhere you fancy. Be careful not to go overboard and lose all those beautiful textures.


There we go. Now our painting has some ominous shadows. But keep in mind, it is better than these backgrounds are too light rather than too dark, and it's always better to assume that more screens will show things darker than your work screen.


Next it's time to drop some more colors into our backgrounds. To keep with the slightly creepy theme, I'm going to add some more dark reds, pinks, and purples. Feel free to turn off your black layer for this.


Make another layer below the one you just did. Repeat the same process as with the shadow layer by dabbing in some globby gradients of color. Just don't overdo it.


Now for the final adjustments. Since we want to make the black layer a shadow value layer, set the mode to Multiply. This means that the darker the color, the more opaque it is sinks into the image while lighter values become more transparent. That way, is it's too dark, you can lighten it up a little with some gray gradients. You can also toggle the opacity to achieve the desired darkness for this layer. The color layer we just did needs to stay below the value layer and keep it set to Normal. And don't forget to label your layers! Organization is key!!


And there you have it! The original painting has been Dark Circus-ified. This process is easy to repeat so a lot of these can be done in a jiffy.


Monday, January 3, 2011

Still Going Strong on Background Coloring

It might still be winter break and the temptations to be lazy are formidable but I will not go down without a fight! Here's a small selection of backgrounds I've completed so far during the break. As long as my tablet works and my coffee mug is full then I shall continue my victorious coloring!

Shot 62

Shot 38

Shot 23

Shot 52


Watercolor Textures

Thanks to my background production assistant, Homin Jang, I now have six custom watercolor textures to work with for the circus backgrounds. Thanks to these, I've been saved several hours of work.


Thursday, December 30, 2010

Go Outside!


For quite some time, all of my colored background have only the indoors to show because I hadn't yet illustrated the outside. Well now there is one! This, surprisingly, took me a little longer to render than the average background. That's because this wasn't made as one image like the other backgrounds, but it's composed of separate layers that can be altered and moved around if I need to use them in other backgrounds.


It started off the same way as a normal background, with a line drawing that gets scanned into Photoshop.


However, the stand alone layers are saved out as PNG files so they behave more like cut-out clothes on a paper doll.

Tuesday, December 21, 2010

Winter Break. Winter, yes. Break, NO!!


The goal for winter break is to pound out the rest of the digital backgrounds in photoshop. So far 6 have been tackled.


And to help me work on my backgrounds is Miss Kitty the Filmmaking Productivity Calico. She keeps my lap warm and makes it difficult to leave my chair so I have no choice but to sit and work. I hope the rest of my classmates are staying warm and inspired. Whether you're relaxing or working, have a good break everyone!


Wednesday, December 8, 2010

I have an assistant! Homin Jang joins the Dark Circus Team


I'd like to thank my friend and fellow CCS animation student, Homin Jang, for lending me a hand on background production. I want the skies in my background to have just a little extra magic to them so I asked Homin if he would be interested in putting his pastel skills to work for me. His illustration work is beautiful and I know that he'll make a great asset to my film. Thanks a ton, Homin!


Look at those amazing colors!! I can't wait to see more!!

Sunday, November 14, 2010

So I Lied: MORE BACKGROUNDS!!


Okay, okay. I know what I said. In the last post I promised that I was done with backgrounds for the semester and that I would do nothing but animation stuff until winter break but I have a legitimate excuse! My cats don't let me animate! It's true, they sit on my light box whenever I try to animate at home so I can only animate comfortably when I'm back in Detroit. So instead of animating the weekend away, I photoshopped up another handful of backgrounds and I'll get right back to key framing once I'm at school again. These two backgrounds are from the beginning of the film so the first few seconds of Dark Circus are almost done! I'm getting a little silly now.


The Culprits!!
Baby Cat (upper left), Stubbins (in the box), Miss Kitty (lower right)


Tuesday, November 9, 2010

Someone's in the Kitchen With Erin


Fresh out of the out of the oven are some backgrounds from the kitchen scene. Don't they look tasty? These are some of the last ones I'll do for until winter break because now it's time to focus on key framing for the remainder of the semester. I'll wrap up the few backgrounds I already have started and then pick back up on the rest of them once school is dismissed for winter break.

Shot 31 background

Shot 32 background

Wednesday, November 3, 2010

The Background Coloring Process

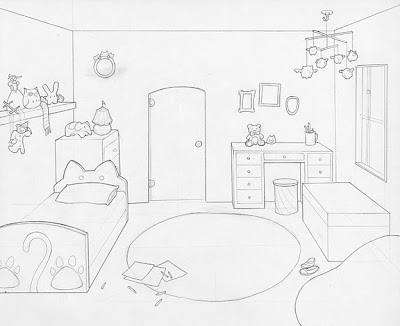
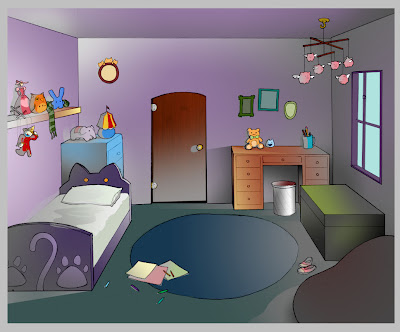
I've spent a lot of time focusing on the backgrounds lately. I guess I want to get a good chunk of them done before winter break. One thing that I have to think about when I'm coloring these backgrounds of the bedroom is that some of these drawings are seen more than once in the film and at different times of the day. This bedroom shot for example is seen at sunrise and at night.
In this post, I'll give a little insight onto my process for coloring these backgrounds.

Morning Lighting
Night Lighting

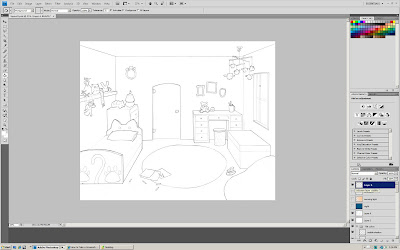
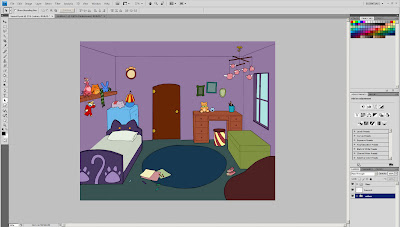
First I scan my layout drawing into photoshop at 300 dpi. Because I am atrociously slow and doing linework in photoshop, I like to do all my clean line drawing right there on the layout.


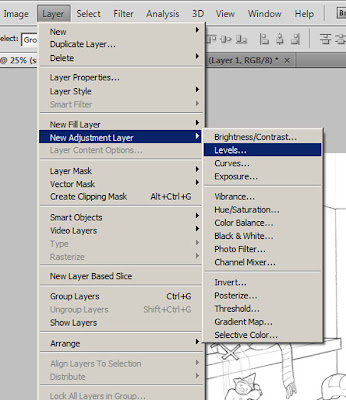
In order to refine the lines a little more, adjust the levels settings. This controls what photoshop determines is true white and what is true dark. This helps eliminate some ghosts of erased lines and any paper textures that seeped in through the scan.

Now that the drawing is all pretty and clean. It's ready for coloring. But first.....


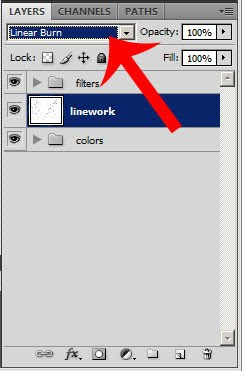
Before I touch my drawing with any color, I need to set the layer compositing mode. I'm using Linear Burn for this drawing because I need the lines to be able to show through the flat color. Compositing modes such as Linear Burn, Color Burn, and Multiply drop the lights from an image (in this case, the white parts of the drawing) and leaves the dark lines in full view. This way, I just create new layers to color on underneath the line drawing layer.


Flat color the drawing. To me, this is actually the most time consuming part of the coloring process just because I'm always messing around with my color choices.


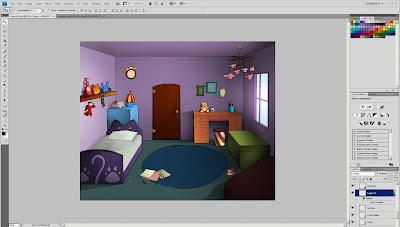
Gradient time! I love drawing with gradients. With the exception of a few touches here and there with the bruch tool, this whole room was rendered with different gradients. Sometimes that means selecting an object, creating a new layer, applying a few gradients to that selection, and changing the compositing mode of the gradient layer just for the shadows alone. There are also gradients for highlights, reflected lights, and cast shadows.
If I were to set all the compositing modes on the layers back to normal, this is what the background would look like. The reason that I shade with value tones like grays and blacks instead of colors is because if I change my mind about a certain color, I can just change the flat color layer and leave the shading layers alone.
Now that all the colors and values are in place, it's ready to see a little sunshine. This shot is first views in the beginning of the film during sunrise, so it needs a pinky-orange cast to it. By laying a peach colored gradient leading away from the window and setting the compositing mode to Overlay, I get a warm morning glow. A few orange sunbeams are dropped in too.
It's a similar process for the nighttime shot. But instead of just a gradient on half the screen, it's a full fill color dropped right over the whole drawing and then setting the compositing mode to Hard Light.


Once the character animations are added in with After Effects, I'll also made a few more lighting changes to the backgrounds. I'll be applying this process to several more backgrounds in the upcoming weeks so I better get my coffeemaker up and running!