I've been bouncing all over the place in terms of production, even with frame processing. I'll share how I do and if any has any suggestions to improve the process, then let me know!
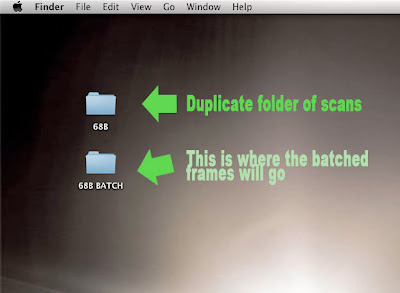
I start by making a duplicate folder of all my scanned frames on the desktop. I also set up a folder that all my finished frame will go to once they are batched.

Before bringing them into photoshop, I label each frame. If you number them, make sure to start off with zeros. This helps keep them in order later. (i.e. 06, or heaven forbid that you have over a 3 digit quantity of drawings then 006)
Open one frame in photoshop, not all of them.
Okay, this next step will not affect the outcome of the batch, but it may affect the outcome of your sanity. Whenever you save something in photoshop, the program asks you to run a compatibility check. Most of us just dismiss this and forget about it. But imagine doing that OVER AND OVER AND OVER until all the frames are done. Yeah, it kills you a little. So we're going to do something to prevent it. Open up your preferences and go to File Handling.
There is a drop down menu next to the dreaded Compatibility checker. Change the setting to NEVER! If you're on a public computer then maybe it is best that you turn this back on to 'Ask' when you're all done just for courtesy's sake.
Now it's time to open up the Action box. (Hmm... action box, that sounds like a good name for a sports show. I'll have to write that down.)
This box should open up. We start off with a new set. Click the little button that looks like a folder.
I like to name the set after the shot title just for keeping things organized.
Now we need our first action in the set. Click on the button with the folded piece of paper.
You should only need to do this once, because once you hit that 'Record' button, then everything you do, where you do it, and how you do it will be recorded. You can always turn record on or off through the process if you need to stop.
Okay, we're recording now. My first action is to unlock the image layer. You can do this easily by going to the Layer box, double clicking on the locked layer, and then hit 'Okay'. Done.
I like to crop down some of my animations, especially the ones that are small and have little movement. This might not be a good idea for ALL your animations so judge wisely. Make sure that your cropping will encompass the entire path of action for your animation because those same dimensions will be repeated with every frame.
Once I do that, I toggle with the levels. Levels adjusts what is true dark and what is true light. This makes selecting the whites of the frame easier. Go to the Image menu and under Adjustments you should find the Levels. (Or apple L for short)
Adjust the little tabs around until the background is a little more pure white and the lines are darker. This might affect the line quality a bit.
Now we are going to select the white area. Using the magic wand tool, select an area in the frame that is white. REMEMBER, the point you click on will be recorded and photoshop will select that point for every single frame If there is a line present there in another frame then the lines will be selected and not the negative space. A corner is usually a good choice. Make sure the Contiguous box is not checked.
Select the white area and delete it. Only the black lines should remain. Easy enough, right? If you want to test out the lines, stop recording (the blue square button in the Action box) and use the paint bucket tool to fill in a test area. If there is still white edges, then more more refining is needed. Undo the paint and start recording again (the red circle button).
Under the select menu is the Color Range function.
This will help us target those tricky little white edges. Select 'Highlights' in the drop box. This will find those stray light lines. Hit 'Okay'. This will select the light pixels and you can simply delete them.
This is what the finished lines look like. If you want to, stop recording again and do another paint bucket test. But turn it back on when you're done because there is one last important thing to record. Save this file as a PSD in the batch folder you set up earlier. If you don't record this, then all of your files will just close themselves when they are done being processed and they won't be saved. Once you have saved, stop recording.
Under the File menu, go to Automate and select 'Batch'.
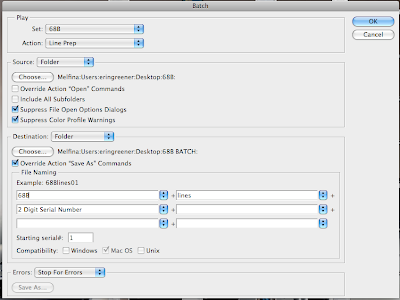
For the Play section, make sure that the Set and Action we started earlier are selected. In the source section, set the source to Folder and choose the folder of duplicate frames we made earlier, not the originals. In the Destination section, set it to Folder and choose the Batch folder you made. Check the "Override Save As Commands" box or else you'll be bombarded by the saving options box after each frame and you'll go crazy. Lastly, and this is really important, name the files. I like to name them after the shot title and then use 'Lines' as the extension so i can know what they are. But most importantly, Use a 2 (or 3) digit serial number. Photoshop's Automate function will name and number each file automatically.
Once you hit the 'Okay' button, your batching will begin. All the finished frames should end up in the batch folder. Make sure to review them when it's done. Batching is one of those things where the planets have to align in our for it to turn out right. One tiny little misstep could ruin the entire batch. And not all shots will turn out identically so there is a lot of judgement involved. I would suggest doing a few practice runs before actually doing it for real. It's a subtle art that isn't easy to get right away. If anyone can think of any ways to improve this process, make sure to tell me so that I can improve this tutorial.


No comments:
Post a Comment